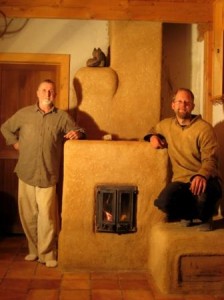
Bill Whyte (homeowner / right hand man) and Nate Johnson ("retired" mason and author of this article) with their firebrick and cob heater.
When I was 27, I moved back to my hometown in northern Minnesota to start a small organic vegetable farm. I sold produce to the wife of a stone mason, and he was looking for help in the winters. I told him I didn’t know anything. “Don’t worry,” he calmly replied, “I’ll train you.” I learned, of course, that hauling an endless supply of block and stone from one place to another doesn’t take much training. But he also handed me a copy of David Lyle’s history of masonry heaters. Three years later I was working for Albie Barden, building heaters for Maine Wood Heat Company, and dreaming of small things, simple things, handmade things. Albie would feed me all sorts of facts and trivia about little heaters and experimental designs, and then we’d head off to build his next massive, beautiful masterpiece. I loved Albie, and also switched careers, finding contentment in the woods, trading my raucous diamond blade grinders and tile saw for a quiet canoe, axe and knife.
Last summer, I flew out west to take Cob Cottage Co’s complete cob workshop, taught by Firespeaking‘s Max and Eva. The project included a hand-formed, all-cob rumford fireplace, and I put myself right in front of it, working with Max on shaping it with nothing but sand and clay, for me a small miracle of simplicity. When I got home, I told my friend Bill about the experience of finally building a fireplace from raw earth, formed with only the background sounds of song, sculpted with bare hands. He pointed at the forgotten corner of his living room, a cinder block chimney next to splotchy walls hooked up to an iron stove, and said, “There you go. Have fun. Make sure it works.”
We debated the merits of a rocket mass heater for a few days. Mark Maziotti, a rocket heater builder in Missouri, told me, “Rocket heaters are for tinkerers, fire lovers, people who don’t mind some smoke now and then and think it is fun to get down on their knees with a box of matches to mess around.” The next day, Katie, Bill’s wife, breezed into the room and said, “I don’t care what you’re doing, but it can’t smoke.” So it turned into something more familiar to me, with an actual door, a bypass to establish draft, and no salvaged metal barrels. It also became something more expensive.
My goals on this project were to see how cheaply I could build a modern-style heater, to find out how simple I could make it while still retaining the principles of contraflow design, to work by hand as much as possible with minimal power tools, and to avoid the use of cement.
I drove to Maine Wood Heat, rented one of their enormous gaping-dinosaur-jaw-wet-saws, cut the firebrick core and clay flue tile bench, numbered all the pieces, picked up a cast iron door and some gasketing, and drove it all back to New Hampshire. Bill got a couple tractor buckets of clay soil from a wet spot just below his garden, and for the next four weeks his employees found him hard to find at work.
Here’s some highlights:
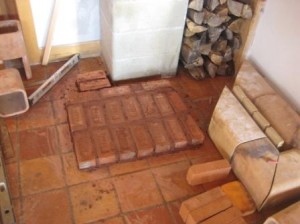 I laid a base course with recycled brick in sand/clay mortar right on the tile floor. The tile floor is on a cement slab.
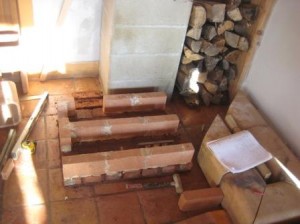 Course one. The front half of the heater will feed into the bench. The bench then goes back through the rear of the heater, under the firebox, and into the flue (which goes up alonside the cement block chimney before entering at the previous stovepipe opening, which I enlarged with a grinder.)
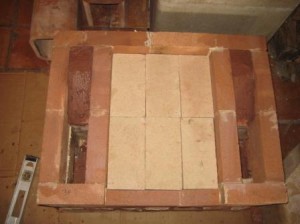 Course three / firebox floor. Set on a 1/4″ metal plate so that the floor of the firebox is totally removable if it starts to wear out over the years. Sloped common brick in the downdraft channels directing gases to front half of core.
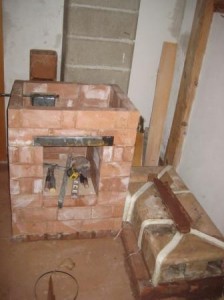 Finished core and bench. To be clear about this – the gases go up the firebox, hit a refractory cap, go down the sides of the heater, under the firebox, through the bench, back under firebox, and enter the chimney at floor level. I had a local welder fashion a bypass, seen in upper left corner – when open the gases go straight into the chimney to establish draft from a cold start. I installed a secondary layer of 1 1/4″ firebrick splits on the back and side walls of the firebox. As they wear out over time, they can be chipped out and replaced without doing any damage to the full size firebrick that make up the structure of the core. It’s like, um, replaceability. There are four cleanouts, two in the bench at the front, and two on the side of the heater. I made custom notched firebrick plugs for each cleanout, and then Bill mounted a simple, removable pine board in the cob facing, which may or may not end up being painted/decorated.
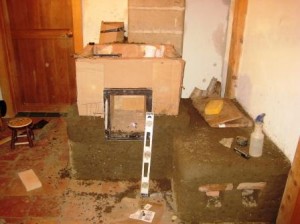 OK, cob facing. Sand and clay, no straw. We didn’t use straw to keep the mix as dense as possible for best heat transfer and storage. It meant that it went REAL SLOW. Even a dry mix would start to slump after about 6 inches. So Bill did a lot of cob work in the evening after our afternoon layer had started to set up, in between stories told to his granddaughter. I went with 3″ thick facing on the back and sides for a quicker heat transfer, and 4″ thick in the front for a better door anchor. The door…I put a mess of pole barn nails, screws, and then a wire network out the sides, top & bottom. This is all embedded in the cob for stability. Strong like a janky spaceship. Pasted a thick layer of cardboard all the way around for an expansion joint between core and facing. Used two layers up near the top in higher heat areas.
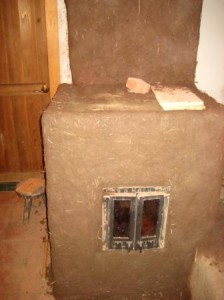 We put a scratch coat of plaster with chopped straw to even things out, and to set tile (left over from the floor many years ago) on the heater top. At the last minute, I stuck a stainless steel pipe that my welder had laying around through the castable refractory capping slabs for overfire air combustion. Albie tells me the most efficient masonry heater burns now days are being done with secondary air combustion introduced into the firebox, 2/3 of the way up. My version is not in the least scientific, but it does make the fire rip when it’s in full burn. The rock on the heater top regulates flow into the pipe.
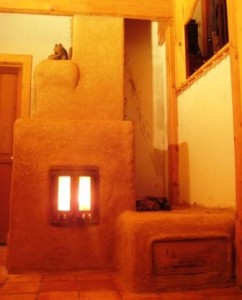 Final plaster with kaolin clay, mason’s sand, finely chopped straw, mortar pigment (“sand” color), and wheat paste. It burns clean, holds heat for up to 24 hours, and kicks out a lot of warmth for its relatively small size.
All in it cost about $1200 in materials. (Firebrick, gas for my pickup, saw rental, discount door, flue tile, firebrick mortar and castable refractory cement…little things add up in a hurry). Labor is a factor here, with the time needed to do the cob facing. I had visions of a $500 heater in materials, but that is for another time.
At a certain point, I started dreaming of a totally hand-formed heater, bags of fireclay mixed with sand for the core, slowly shaped up organically, a cob facing, no power tools, no metal, a simple clay door… If anyone puts one together, let me know. I’m going back to the woods.
A PDF with course-by-course photos
Further Reading:
I’m working on a cast version with a unique gas path through the core. Not entirely organic as the combustion chamber will still be firebrick, but it’s going to be rather interesting 😉 I’ll post when it’s complete
great! we’ll look forward to seeing more!
Hello Nate – Beautiful stove and a great story of how you came to build it. I’m currently building a rocket style batch stove and looking for advice on clay mortar for building the heat riser and bell. I have a bunch of fire clay and a pile of sand. Just wondering if you would share you knowledge here on a good mix that will stand up to the heat and not crack too much. Thank you!
Roberto
Check out this website.I used this mix(recipe) for my rocket stove’s inner chimney core.It held up very well.http://www.rechoroket.com/%22How_to%22_Albums/Pages/Combustion_chamber.html
Fireclay and sand sound like a great mix for a clay mortar. I have never made my own mortar for parts of the firebox that will be exposed directly to flame, so can’t offer any experience except to say that you have what I would use. Good luck!
Thanks for sharing your plans on your cob contraflow, its awesome. Some years ago I bought Albie’s finnish construction manual and was going to start on my own heater project. With lack of masonry experience I instantly became intimidated, and I halted the project. After viewing your step by step stove construction, I’m inspired again. I started ordering material yesterday, and Im going to attempt a similar cob heater. the layout and size are basically the same, yet I would like to go several courses higher in the firebox. Any advice on a maximum height for the box would be appreciated. I feel like I could get away with 3 more courses, but would prefer 5. I have nothing to base that on, and it is really only for asthetics, so I could really just add more cob to the top, I guess. I think I will also add 10% pumice and several tablespoons linseed oil to the cob mixture around the door for support. That might sturdy things up abit. Really excited about getting started, and thanks again for inspirition. Melvin-
the firebox i built was sized to the door I had. so get your door before you build the firebox. a bigger firebox isn’t necessary for that size heater, but you know do what you like!
pumice and linseed oil doesn’t sound like it would add any support around the door, but I’m not super versed on these things.
I’m headed off to the woods for a long while here so good luck on your heater!!
Nate
For a heater of the about the same size, is it posssible to make a longer “bench” for more heat radiatation and still have adequate air/heat flow through the bench and out through the chimney?
Yes. I have no idea how much longer, but I’m sure quite a bit longer would be fine. This was merely sized to fit the corner of the room. A significantly longer bench may make cold starts a little trickier, but if you have a bypass that solves it, or you can heat up the chimney via a cleanout before lighting a fire in the main box….
Yes, I concur with Nate. There has not really been much, or any, research done on maximum lengths of benches. In general, we tend to be conservative because we don’t want to build a heater that doesn’t work and the effort involved in making a heater is significant enough that experimentation is difficult.
The basic guideline, as I understand it, is that you need enough residual heat in the chimney at the end of the bench runs to still produce draft. I have heard that, for example, the temperature needs to be 200 deg. farenheit, but I am not sure how accurate or valid this is.
In practice, Nate’s observation about including either a bi-pass damper or a cleanout at the bottom of the chimney that doubles as a primer is a great way to make longer benches work and ensure that they overcome any initial inertia. Bi-pass dampers are more convenient for the user but more difficult to install. Primers involve making a sperate, quick paper fire underneath the chimney and then sealing that opening and creating a fire in the main firebox. I recently had the experience of starting a rocket mass heater that gave me some trouble on initial startup by doing this. It was a phenomenal experience…… The paper and kindling in the feed tube had gone out – or so I thought. We opened the primer/cleanout plug and made a two-sheet-of-newspaper fire there, plugged it…. and, as we prepared to rebuild the fire in the feed tube, we all of a sudden heard a “boom” where it all ignited again. The suction created by the fire further down the line that now only could get its air from the feed tube had been so significant that it must have brought some invisible embers in the newspaper back to life and away we went. It was a remarkable experience with physical phenomenon for all of us in the room. Here is a link to that rocket mass heater build… and an attempt to include a photo of it below showing the cleanout/primer in question:

Max,
love that design of yours, with cleanout/primer right next to the firebox! very convenient. great story about rocket heater sonic boom take off. still want to build a rocket heater with you one of these days. get out to New England, i’ll hook up the site. -Nate
Max, interesting that you mention the rocket stove. Is it possible to combine Nate’s Masonry Heater with the Rocket’s “same level” low temp exhaust? That’s why I asked about a longer bench, thinking more length would extract more heat and “cool” the exhaust. Although the constant “tinkering” with a rocket doesn’t appeal to me, one of the big advantages of the rocket is no chimney. I have a very old house (about 197 years old) that at one time had a fireplace with, of course, a chimney, which has long since been torn down, and I don’t want another one.
Excellent plans. I am anxious to build one, cottage size, in my home. I live close to Albie and CO., but they unfortunately, have out priced themselves for my budget/expectations. I am open to suggestions, more details, help. Thanks for sharing!
Hi Nate,
I want to build one!
It looks like the fire has 3 paths to get into the floor chamber from the fire box is this correct? Is there a plan in one of the books that you mentioned that has the style of firebox you are using here?
The part I cant figure out is, where the fire exits the firebox, and which routes it takes to make it to the bottom channels. Everything else seems really straight forward to me. Thanks so much for sharing this plan and inspiring me so much!
Neeks-
I want you to build one! I am using a very very simplified version of a finnish contraflow firebox. The Masonry Heater Association design portfolio would have some plans along those lines, except more refined.
To clarify: The fire exits the firebox directly above, hits a refractory capping slab, then splits into two and goes downward along both sides of the firebox. From there it hits the floor (at the front half of the heater), enters the bench, winds back under the firebox (at the back half) and enters the chimney.
The course-by-course PDF at the end of the article should show this. All that is lacking is a photo at the end of the capping slabs, which I forgot to take a picture of, but are set right on top of the finished core.
I hope this is making sense.
Nate
Thank you very much for your article. You’re mention of an all Cob home heater is an idea I’ve been looking for online dutifully for a few days, with no results. Until I found this article. I’m still months from beginning this project, and many hurdles to figure out, but even to hear someone mention it gives me hope that it’s not as stupid an idea as I was beginning to fear. Stuart or Nate, if you’re still listening, I’d love to throw some ideas back and forth. Thanks again for the article Nate!
Thomas,
Glad you enjoyed it. Throw out an idea and let’s see what happens, I’d love to see one built…
Nate
Stuart,
The cob is strong and sound. We did a scratch coat of plaster with straw in the mix, and then a finish coat of plaster with finely chopped straw, and I’m sure that helps structurally, but you know most cob bread ovens I believe are built the same way with a clay/sand inner layer, and in the case of this heater the cob never gets direct flame, so the stress on it is minimal, especially in comparison to a cob oven.
There is a crack that radiates out from the upper corners of the door, which is the result of some miscommunication between the owner and I as well as insufficient gasketing around the metal door frame (don’t skimp!), but it ain’t no big deal. Smiles when hot, closes up when cool. Nothing is going anywhere.
Thanks for reading, good luck!
Nate
Hey Nate… this is a very interesting article, and a very interesting design you have presented. I have been bouncing the idea of trying to come up with an ultra low cost masonry stove for years now and still haven’t gotten around to it, but I’m very pleased to see that someone has.
My biggest question regarding cob without straw, especially for this application, is… how does it hold up to heat stress? Has this thing started cracking and falling apart after a period of use? Straw gives tensile strength to cob, but of course it would be problematic for this purpose because it would tend to carbonize I’d guess.
If you do encounter problems with cracking and structural integrity on the cob exterior, I would suggest that fiberglass strands be used in the cob mix instead of straw. They use this in a lot of concrete applications now, and I think it would probably work very well for this purpose. It has super high tensile strength, and is non toxic, non out gassing, and non combustible.
Please let me know how long this stove has been in use and how the cob facing is holding up… I am very interested in trying this out myself.